Friday, 27 October 2017

New Layout using Little Birdie tinted metallics

Hello crafters,

Today I am again sharing one of my works.As I was  fortunate to receive  Little Birdie Tinted

metallics from ITSYBITSY,I have been using them on all kinds of projects.Uptil now I have made a

frame and used them on clay,made some 3d altered project and used on various metal ,glass and

plastic surfaces and colored  some paper for flowers with them.I find them excellent to use and the

 sheen is just mesmerising.

 Mixed media layout with Tinted Metallics  


Here I am sharing a layout which i made with my pic with my boys.As my elder son now stays in

hostel I am often flipping old pics just to remember his childhood.I have used a 12x12 black

chipboard base for this layout and the frames are of MDF.Pics are self explanatory but feel free to ask

 if something is not clear.

Both the frames were given texture with modelling paste and the chipboard also .I coated the frame

randomly with lime crush and caribbean teal color and did dry brushing with twany glint.Also used

 corrugated sheet (colored black with mont marte black gesso and dry brushed with twany glint) to fil

 the inside of the frame.The smaller frame was colored with black,and pink color splash.As i was

going to use some lace I colored the lace also with color splash pink.


I am very fond of making flowers and I colored the paper with metallics (lime crush and caribbean 

teal ,and pink color )and diecut the flowers.Upon shaping i did dry brushing with Twiny glint copper 

shade.I am happy with the outcome.All other small filler flowers were also made .Once all elements 

were ready i did a dry run before pasting them with pva glue and silicone glue .


I choose to use one of my colored pics .The final layout looks like this.Enjoy and links of product 

used at the end of the post.


Products used:Little birdie Tinted Metallics  


thanks for viewing and happy crafting,

Ruchi


Tuesday, 24 October 2017

Mixed Media Frame using Tinted metallic paints from ItsyBitsy.

Hi to all the crafters ,


Today I am sharing a project which I created for Itsybitsy using their recently launched Tinted 

metallic paints and featuring the same on their blog as guest designer.

First and foremost my heartfelt thanks to Rashmi Harish for thinking of me and Anitha 

Mallesh for organizing the delivery.I am extremely happy with the results achieved and was 

pleasantly surprised by the supremely smooth finish and the shine which these paints have.

The links to the product is as follows:


As diwali is on the way and most of us are cleaning our houses ,we encounter many things that are

lying waste or discarded.I too found a frame along with the backing as it was damaged in a mishap

and the mirror broke leaving a crack and dent on the frame.This was a perfect project for me to

tackle.


 I dismantled the frame and the backing ply .First I took frame and applied Mont marte Modelling

paste and Little birdie stencil which I got from the store.Also randomly laid some modelling paste

with knife and sprinkled some long glass beads .As modelling paste has very good adhesion try and

lay down stuff when it is wet so that no glue is needed.Once dry I applied black gesso(mont Marte)

 again from the store.http://itsybitsy.in/modelling-paste-mpa0041-500ml-tub-mm


Now was time to create the main project .For this I wanted to try the embossing method to create

look of texture.This technique is widely used and is popularised by Paul bozzo .I made clay with

marble powder and pva glue, as my efforts at using joint compound or wet putty were not very

satisfactory.I pasted the clay in an even fashion on the board..Pls refer pics for clarity.


 I used a rolling pin to give smooth and even coverage.You can spread this clay with your hands with

 help of some water.I than decided to bring out all my wooden blocks and some stamps to make

marks in the clay.Do wait for some 10 minutes  before you start mark making.Also do not press to

hard into the clay.This is the most fun part and you can use your creativity to achieve results of your

choice.


 Next step was to color the project.Leave the marble clay to dry for at least 12 hrs before you start

doing anything on top of it.I was quite eager to open the little jars of metallic colors,and yes was not

disappointed!!!.They were creamy and very smooth.Also they were thick enough to stay on the brush

and not drip.The shine on these was excellent.I specially recommend the three colors i have used if

you want patina effect or are thinking of festive upgrades to your projects.Layer your color

alternating with a coat of gel medium/acrylic gloss medium to seal the layers.

Start with the light   shades and move to dark.I

used lime crush and followed by caribbean teal  and finished with burnt umber

(acrylic +water)wash.Rub off excess paint before it dries.


 I am quite happy and thrilled with the results and with the shine and shimmer that these metallic

paints have given to the project.Also I did some dry brushing of copper on to the frame to bring out

the texture work.I choose an image from Calender to use as my focal point and pasted the same on to

 thick cardboard with fevicol and used acrylic gloss medium to seal it.I decided to paint some paper

with the same colors and made small flowers from it.Also all the chipboards were treated with the

same colors.Think results speak for themselves as the patina effect comes out beautifully.


Now comes the placement of all elements.Do a dry run by placing things and adjusting how you like

them.I use silicone glue by itsybitsy to paste all embellishments and double sided tape for the

cutout.This is the final output and i am glad with the richness of colors .Hope you to enjoyed and

 would try these colors.Thanks for bearing with a long post.Regards.


Sunday, 22 October 2017

Good morning friends,

Today I am sharing some work which I did during the ongoing Diwali festivities.

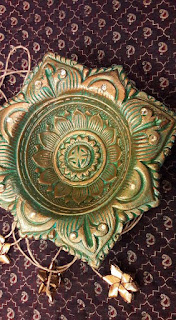
It was a simple project but the results were very good I transformed a terracotta diya into a metal patina look.For this I used the tinted Metallic Paints available at ITSYBITSY.

The pics are self explanatory .I dabbled both lime crush color and caribbean teal fist to achieve a rust kind of look and than did dry brushing of twiny glint.Hope you will attempt the look.Thanks and Regards


If there is any confusion please feel free to ask.Thanks for viewing and happy crafting.